Using the EC2 Integration with Sensu Enterprise
In this guide, we’ll cover configuring and using the Sensu Enterprise Amazon Web Services (AWS) EC2 integration.
- Prerequisites
- EC2 Integration Basics
- IAM Roles and Sensu
- Cross-Account IAM Roles
- Wrapping Up
- References
Prerequisites
Before diving into this guide, we recommend having the following components ready:
- A working Sensu Enterprise deployment
- An AWS account
- An AWS access key and secret key
If you’ve not already signed up for Sensu Enterprise, you can do so via this link. The same goes for an AWS account. You can sign up for an account here. Once you’ve signed up for an AWS account, you’ll also need to provision an access key and secret key for the user you want to use for Sensu Enterprise. AWS provides a useful guide for provisioning those keys that you can use to get started.
NOTE: Make sure you save the CSV with your AWS access and secret key in a safe location.
EC2 Integration Basics
Sensu Enterprise comes with a built-in integration for handling automatic deregistration of AWS clients. This is especially useful in environments where infrastructure is ephemeral. We’ll start off by configuring the integration using the access key and secret key we provisioned for our AWS user.
Integration Configuration
Our integration configuration file for EC2 will live at /etc/sensu/conf.d/ec2.json. Let’s take a look at an example:
{
  "ec2": {
    "region": "us-west-2",
    "access_key_id": "AlygD0X6Z4Xr2m3gl70J",
    "secret_access_key": "y9Jt5OqNOqdy5NCFjhcUsHMb6YqSbReLAJsy4d6obSZIWySv",
    "allowed_instance_states": ["running"],
    "timeout": 10
  }
}
When using the EC2 integration in this fashion, the only two required attributes are access_key_id and secret_access_key. The rest of the attributes are optional, but let’s take a look over them
region: The region attribute is the region that the integration will use for queries about the instance’s state. By default, this is set to us-east-1 (the “Virginia” region).
allowed_instance_states: The allowed_instance_states attribute determines the state that an instance can be in before it is automatically deregistered. By default, this is set to “running”, but you can also set it to “running”, “stopping”, “stopped”, “shutting-down”, “terminated”, “rebooting”, and “pending”. Any instance that is in a state not specified in the configuration will be deregistered.
You can use the above example configuration and substitute your own access key and secret key in for the ones in the example. Let’s continue and take a look at what is necessary at the client level for the EC2 integration to function properly.
NOTE: Don’t forget to restart the Sensu Enterprise process via systemctl restart sensu-enterprise for the configuration changes to take effect.
Client Configuration
In order for the EC2 integration to work, some attributes are needed inside of your clients’ configuration. Let’s take a look at another example configuration:
{
  "client": {
    "name": "i-424242",
    "...": "...",
    "keepalive": {
      "handlers": [
        "ec2"
      ]
    },
    "ec2": {
      "instance_id": "i-424242",
      "allowed_instance_states": [
        "running",
        "rebooting"
      ]
    }
  }
}
In the example above, there are several key attributes that you’ll need to be aware of when configuring your own Sensu clients:
name: The name attribute here is important. By default, Sensu will take a look at the hostname of an instance and use that as the client’s name unless it is explicitly configured. You can set the name attribute to be the same as the instance_id and avoid having to specify it inside of the ec2 scope, but this can make instances difficult to identify.
keepalive scope: Inside of the keepalive scope, you must specify the ec2 handler as in the example above.
ec2 scope: The ec2 scope contains a number of attributes that you’ll want to be familiar with.
instance_id: This attribute must be present if an instance’s name attribute does not exactly match the instance’s EC2 instance id. If this is not set, and the attributes do not match exactly, automatic deregistration will not take place.
There are a number of other attributes that you may use in your configuration. See the client reference documentation for more information.
IAM Roles and Sensu
It’s possible to use the EC2 integration without specifying the access_key_id and secret_access_key by setting an IAM role for your Sensu Enterprise servers, if you’re running Sensu Enterprise on EC2 instances. Here’s an example configuration that you would use to activate the EC2 integration:
{
  "ec2": {}
}
You’re seeing that correctly–in order to use the EC2 integration, all you need to do is create /etc/sensu/conf.d/ec2.json with an empty hash under the ec2 scope. We’ll now take a look at what needs to be done on AWS.
NOTE: This step assumes that you have the AWS cli tool installed. If not, please download the package for your distribution or head to the AWS cli documentation for further installation instructions.
You’ll need to download the following example policy documents to follow along:
-
Create the IAM policy
Note the ARN for this policy, needed for step 3aws iam create-policy --policy-name sensu-ec2-iam-policy --policy-document file://sensu-ec2-iam-policy.json -
Create the IAM role
aws iam create-role --role-name sensu-enterprise-integration --assume-role-policy-document file://sensu-ec2-iam-role.json -
Attach policy to role
aws iam attach-role-policy --role-name sensu-enterprise-integration --policy-arn "arn:aws:iam::11111111111:policy/sensu-ec2-iam-policy"
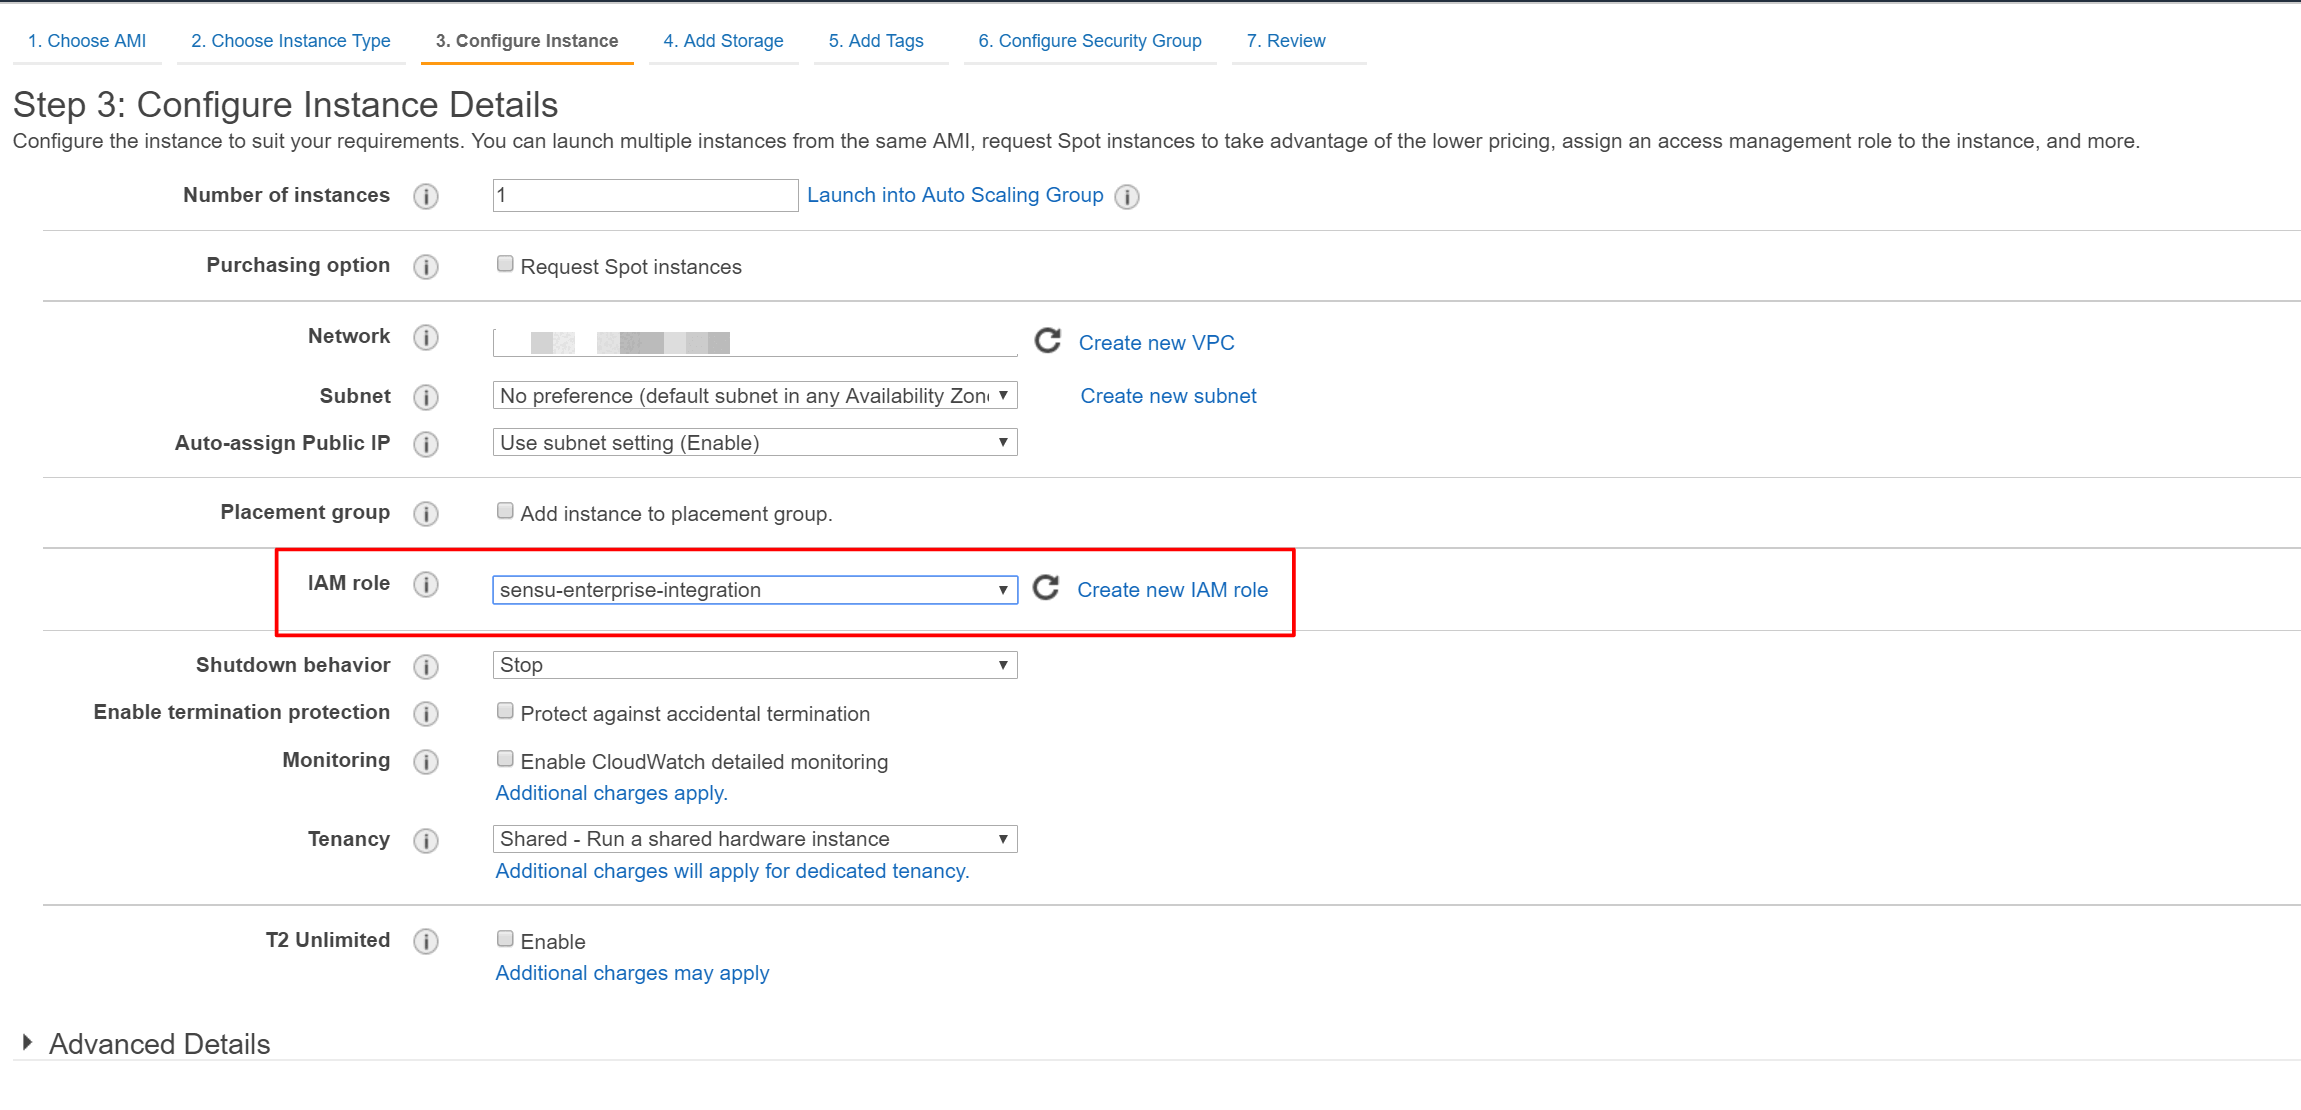
Now that we’ve created a policy and a role for the integration, we’ll need to attach it to our Sensu Enterprise instance. You can do this during step 3 of creating any instance via the EC2 console:

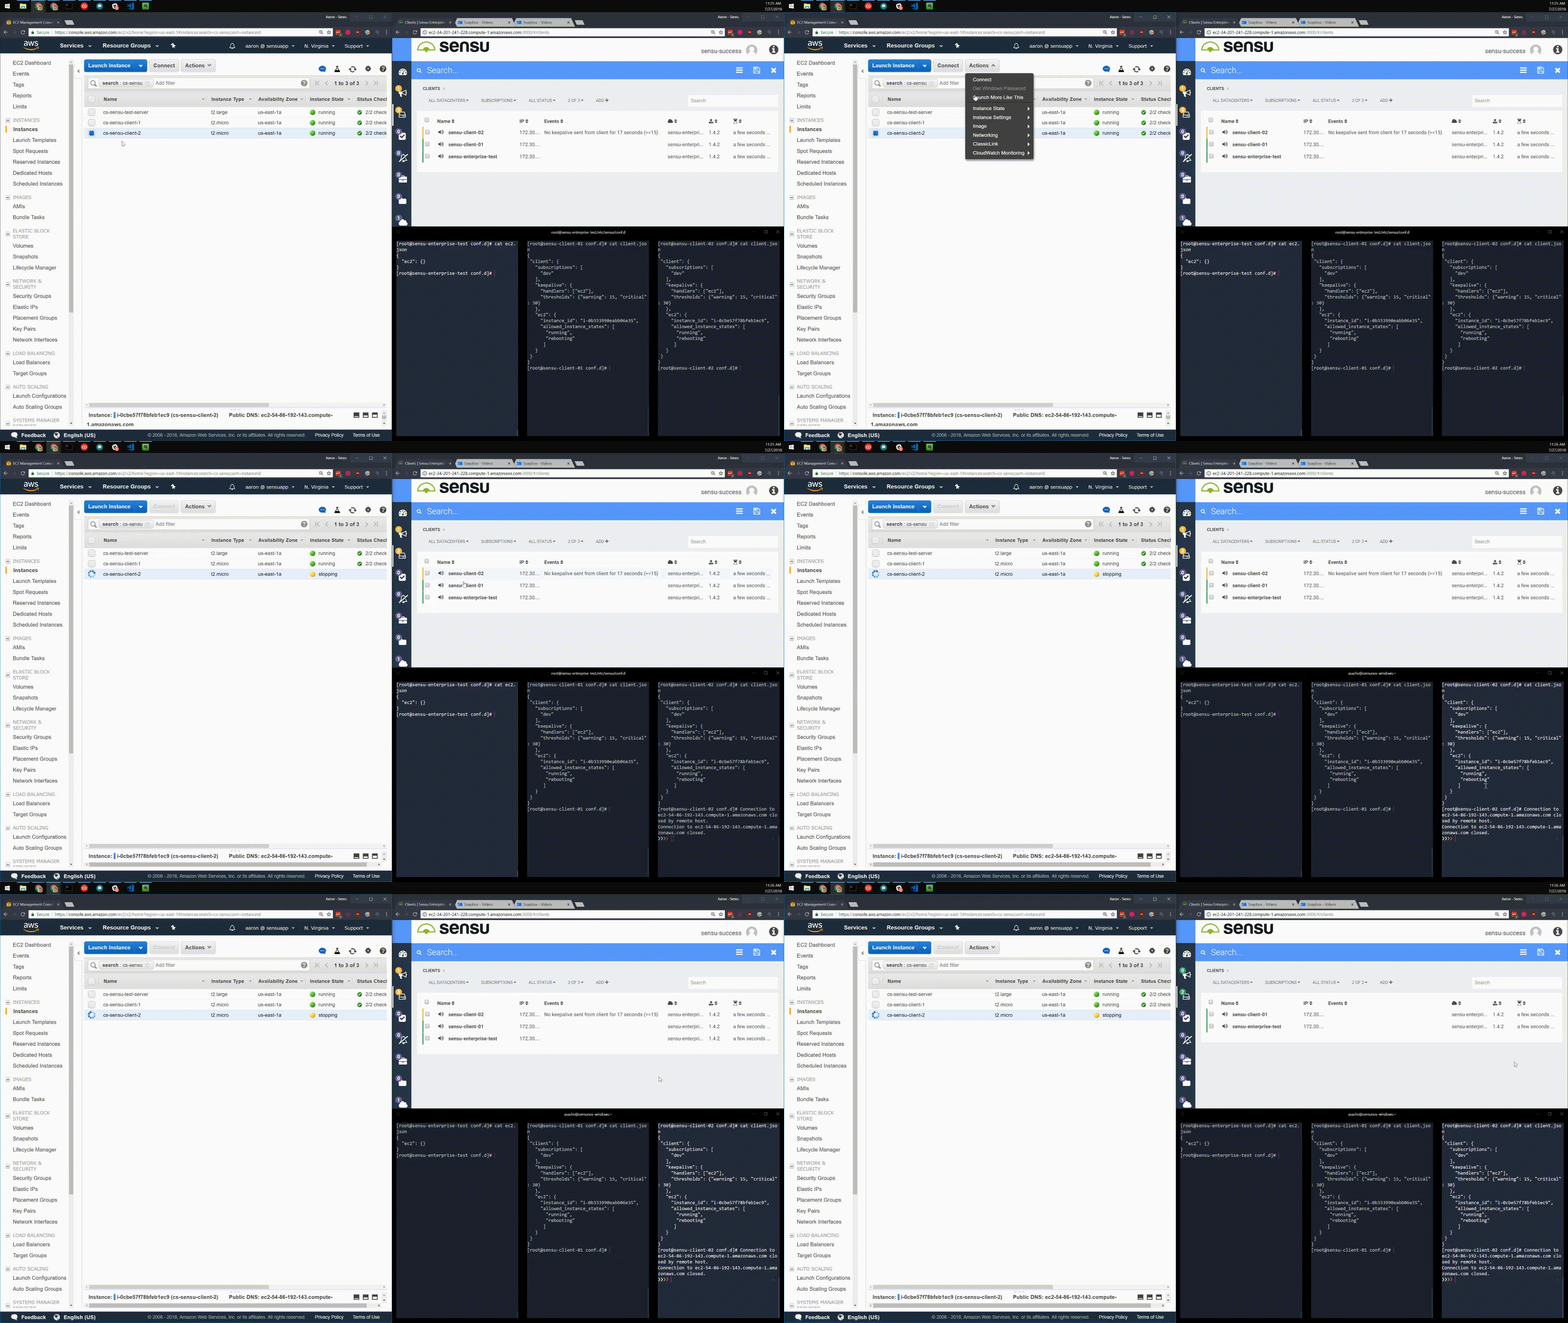
Now that we have the policy and role created, and the role attached to an instance, let’s see this in action on a test instance:

Cross-Account IAM Roles
Definitions
Trusting account – an AWS account where Sensu Clients are running. An IAM ‘read-only’ role is created here allowing ec2:DescribeInstances action, with a policy that allows the trusted account’s instance role to assume the read-only role.
For the purposes of this document:
- The AWS account number for the trusting account is assumed to be
111111111111 - The AWS CLI is assumed to be configured with a profile
trusting
Trusted account – an AWS account where Sensu Enterprise is running. An EC2 instance is created here with an instance role attached allowing the instance to assume a role in the trusting account.
For the purposes of this document:
- The AWS account number for the trusted account is assumed to be
222222222222 - The AWS CLI is assumed to be configured with a profile
trusted
Configuration
You can download the following files to follow along:
- Cross Account RO Policy
- Cross Account RO Role
- Cross Account Assume Role Policy
- Cross Account Assume Role Policy Role
Integration Configuration
You’ll need to configure the EC2 integration file at /etc/sensu/conf.d/ec2.json so that it knows which account should be used when querying the API. See the example below:
{
  "ec2": {
    "accounts": [
      {
        "name": "sensu-testing",
        "role_arn": "arn:aws:iam::111111111111:role/cross-account-readonly"
      }
    ]
  }
}
Where the account in the ARN above is the account that will be queried.
Client Configuration
Clients will also need to be configured to use a specific account. This is done by the “account” attribute specified in client.ec2 scope of /etc/sensu/conf.d/ec2.json. See the example below:
{
  "client": {
    "name": "i-424242",
    "...": "...",
    "keepalive": {
      "handlers": [
        "ec2"
      ]
    },
    "ec2": {
      "account": "sensu-testing",
      "instance_id": "i-424242",
      "allowed_instance_states": [
        "running",
        "rebooting"
      ]
    }
  }
}
Trusting account
Now, let’s walk through the steps to create the requisite policies and roles in the AWS test accounts. We’ll start with the trusting account.
-
Create ‘read-only’ IAM policy
Note the ARN for the policy created above, as it’s needed for step 3.aws iam create-policy --profile trusting --policy-name cross-account-readonly --policy-document file://cross-account-readonly-policy.json -
Create ‘cross-account’ IAM role
aws iam create-role --profile trusting --role-name cross-account-readonly --assume-role-policy-document file://cross-account-readonly-role.json -
Attach policy to role
aws iam attach-role-policy --profile trusting --role-name cross-account-readonly --policy-arn "arn:aws:iam::111111111111:policy/cross-account-readonly"
Trusted account
Now, let’s take a look at what’s needed to create the policy and role in our trusted AWS account:
-
Create ‘cross-account-assumerole’ IAM policy
Note the ARN for the policy created above, as it’s needed for step 3.aws iam create-policy --profile trusted --policy-name cross-account-assumerole --policy-document file://cross-account-assumerole-policy.json -
Create ‘cross-account-assumerole’ IAM instance role
aws iam create-role --profile trusted --role-name cross-account-assumerole --assume-role-policy-document file://cross-account-assumerole-role.json -
Attach policy to role
aws iam attach-role-policy --role-name cross-account-assumerole --policy-arn "arn:aws:iam::222222222222:policy/cross-account-assumerole"
Wrapping Up
That’s all for this guide on configuring and using the Sensu Enterprise AWS EC2 integration. We covered the following topics:
- Configuring the EC2 integration
- Configuring the client for use with EC2
- Using IAM roles in lieu of keys
- Configuring the EC2 integration for use across accounts
We hope you’ve found this useful. For additional resources about the EC2 integration or client EC2 attributes, see the reference links below.
